Have you ever directed a red or green laser pointer at your fingertip and watched it glow from the other side – like your skin suddenly lights up from within? It’s a weirdly magical moment: your finger turns red, not from heat, but because the light is literally traveling through your body.

Figure 1. Shining light from a laser pointer through a finger significantly changes how light propagates (Image source: Robert Glen Calderhead & Yohei Tanaka: Photobiological Basics and Clinical Indications of Phototherapy for Skin Rejuvenation | IntechOpen). It is much more different compared to a small spot on a floor when parallel light beam travels through air.
Interestingly, after traveling through the finger, it is not possible anymore to observe a well-defined circular spot on a wall, which you may have used to play with a cat. Furthermore, a much larger area of a fingertip emits light compared to a small area of the initially irradiated beam. This is because the light passing through the finger is not going along one direction anymore (we say that light beam is not collimated) compared to the light emitted by the laser pointer.
Why is beam not collimated despite being parallel at the tip of the pointer? This is because light passing through a tissue experiences multiple interactions with the molecules, cells, organs, etc. in the body. Each of such interactions changes the direction of light propagation essentially spreading the initially collimated beam. This type of interaction is called scattering; it is very strong in tissues (on average 1 scattering per 1 mm of light travelling path length) and we always must take it into account when doing optical measurements of tissues.
Scattering is not the only interaction between particles (a general name of an interacting body), the second phenomenon is absorption. If you are able to collect all the light passed through the finger (e.g. by means of lenses and mirrors) and measure its intensity with a photodetector, you will find that the total intensity is smaller than the one emitted by the pointer. Part of the light intensity just got absorbed by the finger and dissipated in the form of heat.
It is generally not possible to feel the absorbed light as the energy transferred to the finger is small, but there are of course certain limits on how much light can be directed into different parts of the body. Eyes are the most sensitive organ to light and care must be taken together with protective measures! It is generally not safe to look directly even at a laser pointer because even slightly powerful laser pointer can cause damage to eye and even make it blind!
Thus, what seems like a party trick with a laser pointer is actually a glimpse into one of the most fascinating tools in modern science — using light to peer inside the human body.
Analyzing the light that passed through a body part scientists can reconstruct images of blood flow, oxygen levels, even tumors — all using the same basic physics as that glowing fingertip. Such reconstruction is named optical tomography, a powerful imaging method that helps doctors visualize what’s happening beneath your skin without surgery or X-rays.
To understand how optical tomography turns light into a diagnostic tool, imagine trying to map out a foggy room using only flashlights. You can’t see straight through it, but if you shine light in from one side and detect what leaks out the other, you can start to infer what’s hidden inside — denser objects will absorb more light, and the way light scatters reveals shapes and structure.
Biological tissue is a lot like that fog. When we shine NIR light into the body (typically around 650–900 nm), it scatters many times but still makes it through — especially through soft tissue like the brain, breast, or muscle. This is the diffusing regime of light propagation and, correspondingly, this specific type of tomography is called diffuse optical tomography (DOT), which is the main subject if this blog post.
By placing detectors on the surface, we can measure how much light emerges and how long it takes to propagate from sources to detectors. The signals from the detectors are then used to mathematically reconstruct images of what’s happening inside.
How does diffuse optical tomography happen?
What is needed to be able to collect good enough data for image reconstruction in DOT?
Here’s what we generally use with a particular example of our time domain DOT system (Figure 2):
- Phantoms:
These are lab-made tissue mimics (like gels or liquids) that let us test and calibrate our system before using it for real diagnostics. In our case the phantom consists of an outer solid part made of epoxy resin filled with titania (TiO2) nanoparticles to create multiple scattering. The inner liquid part is filled with an intralipid solution and the inclusions with varying scattering and absorbing properties are immersed into the liquid. - Light Sources with timing or Modulation Systems:
Usually lasers or LEDs that emit near-infrared light. In some systems, we use continuous wave laser, in some pulsed lasers or modulated light to track how fast light travels — much like sonar or radar, but with photons. - Fiber Optics:
Flexible light pipes guide the light into and out of the phantom and help us scan different parts of the phantom. Optical fibers are these multiple blue and white wires on Figure 2. - Detectors:
Highly sensitive detectors like photodiodes, cameras, or photon counting detectors pick up the faint light that emerges from the body after being scattered. The signals are often millions of times weaker than the original beam. In Figure 2, an extremely sensitive and fast avalanche photodiode from ThorLabs is used to detect the signal in time domain. - Fast electronics:
Usually highly sensitive detectors produce analog electric signals – continuous signals within certain continuous range of values which are not generally suitable to be processed on a computer. These analog signals need to be sampled first to convert them to digital data. And these signals need to be sampled with extremely high frequency (remember how far light travels in one second!). Here we use a top-level LeCroy oscilloscope to convert data from avalanche photodiode, for example, photon counting detectors typically use very specialized electronic to do analog-to-digital conversion. - Computers and Algorithms:
As soon as the data is digitalized, a computer can record it for further digital signal processing before the data can be supplied to an image reconstruction algorithm. This is the stage when physics, mathematics, and programming come together. Typically, we use Matlab (Python can be similarly used as well) to digitally process the data, such as applying time-series and Fourier analysis. The processed data then goes to image reconstruction algorithms, but this is the story for another blog post.
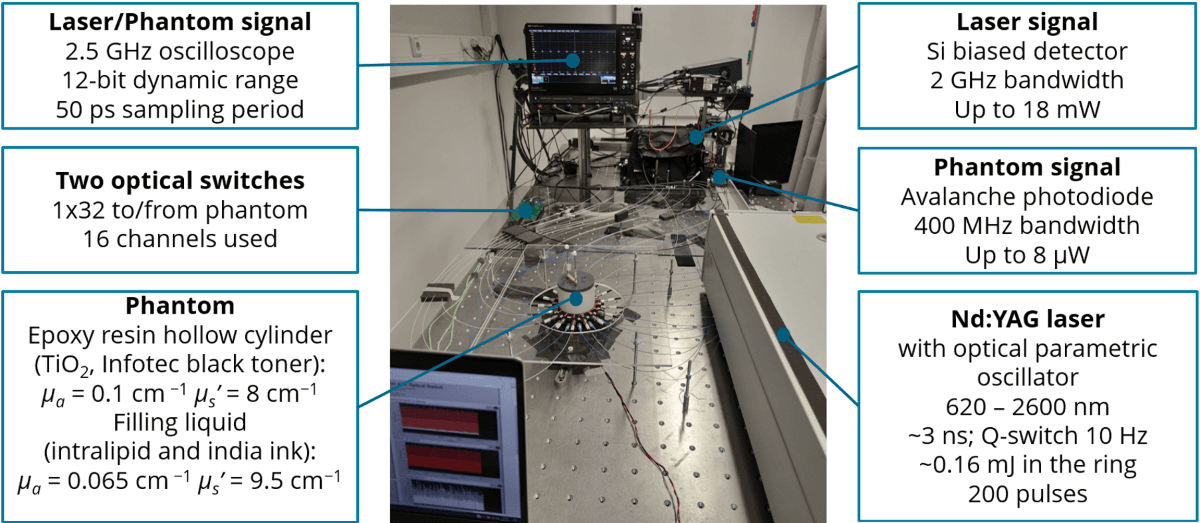
Figure 2. Time-domain diffuse optical tomography system at the University of Eastern Finland.
What kind of skills one needs to make diffuse optical tomography happen?
Building and using an optical tomography system isn’t just about lasers and lenses — it’s a hands-on, brains-on blend of physics, engineering, coding, and creative problem-solving. Here are some of the key skills I use for building a new continuous wave tomography setup, and how these skills come into play in the lab:
1. Optics & photonics knowledge
Used when: designing and aligning laser paths, choosing lenses and filters, understanding light-tissue interactions.
You need a solid grasp of how light behaves — how it bends, scatters, reflects, and gets absorbed. This helps you plan experiments, interpret measurements, and build setups that work with the quirks of light in biological media.
Why does light scatter more in skin than in muscle? Which wavelength reaches deepest? These are optics questions you’ll answer often.
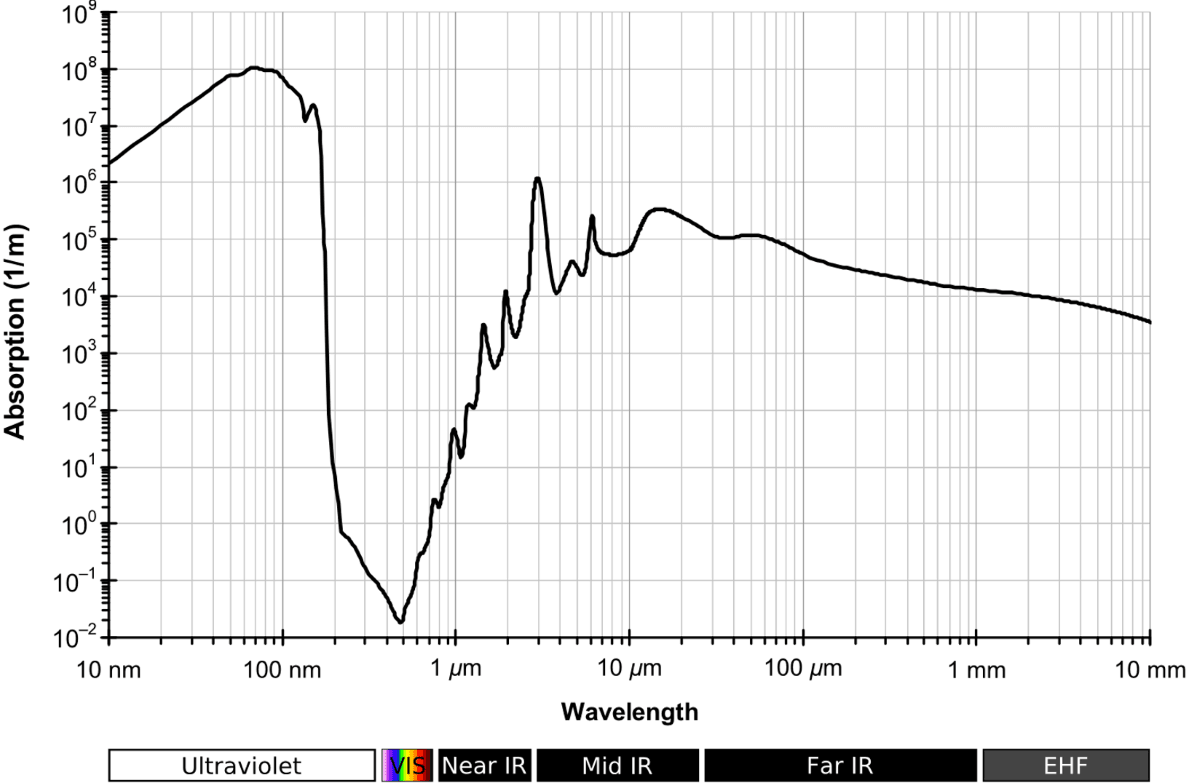
Figure 3. Wavelength dependence of water absorption coefficient across a wide range (Image source: https://en.wikipedia.org/wiki/Electromagnetic_absorption_by_water).
2 Instrumentation & automation
Used when: connecting photodetectors, configuring amplifiers, timing pulses, or designing custom circuits.
Even if you’re typically not building circuits from scratch, you’ll be dealing with voltages, timing signals, and interfaces between hardware and software. Most of the devices provide analog synchronization signals and these are mandatory to use when you need to synchronize your devices with picosecond time resolution. Understanding basic electronics helps you control, trust, and automate your measurement system.
You don’t need to be an electrical engineer — but knowing how not to fry your photodiode is very useful.
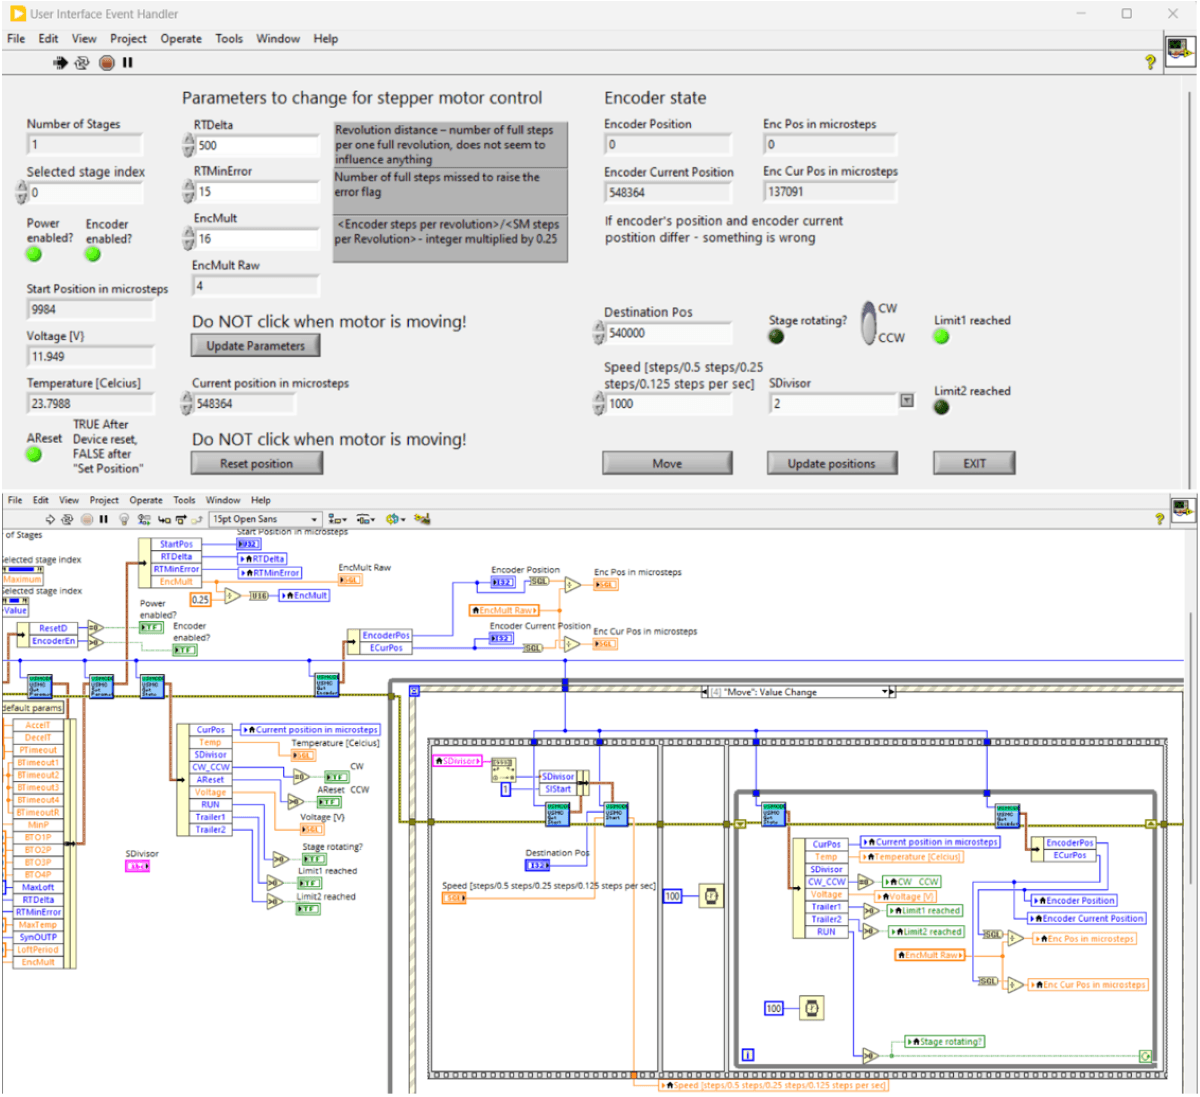
Figure 4. A screenshot of NI LabVIEW front panel (top) and code (bottom) to operate a rotating stage with a stepper motor. Eventually, it will be used as a part of the whole setup to control the position of phantom together with laser, infrared camera, and balanced detector.
3. Phantoms & components
Used when: developing phantoms, building custom components, holders for phantoms
Mimicking tissue optical properties is not a straightforward task. To prepare phantoms for an experiment you will be dealing with the basics of colloidal chemistry in a fume hood and with the basics of plastics works in a mechanical workshop. Designing templates, making them with a 3D printer or in a mechanical workshop, using a fume hood with a magnetic stirrer and graduated pipettes – these are the common things you experience when fabricating phantoms!
Being able to carefully weight components and having easy-to-use phantom templates are the prerequisites for reproducible phantom preparation.
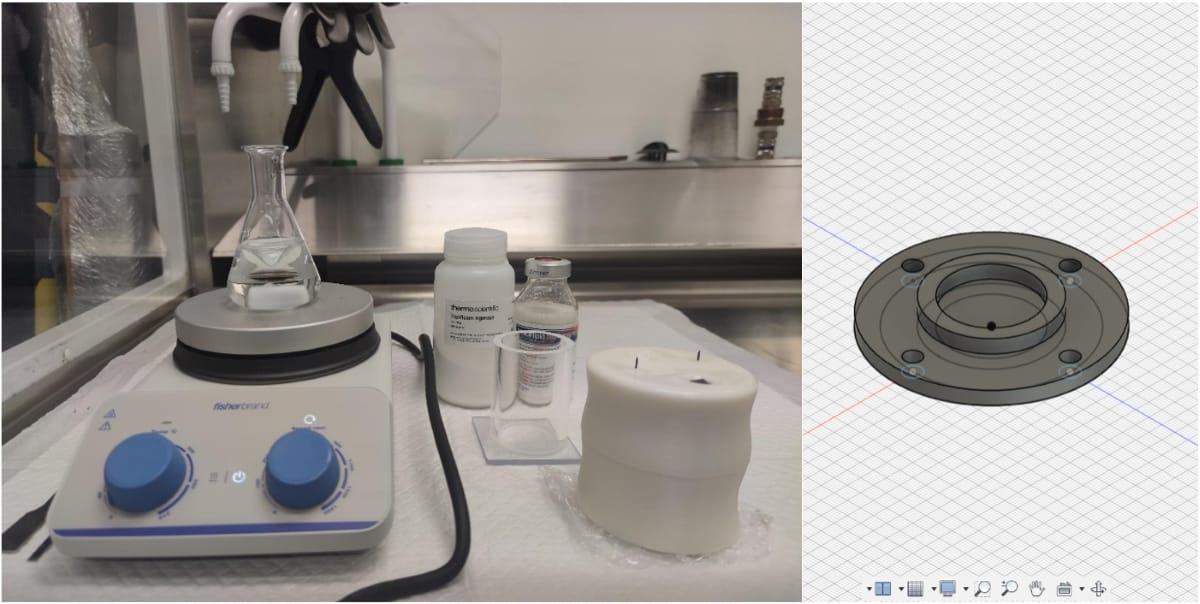
Figure 5. Heating up agarose solution for its uniform mixture for phantom preparation (left). A screenshot from Autodesk Fusion 360 design of a phantom holder to be printed on a 3D printer (right).
5. Experimental design & troubleshooting
Used when: setting up optical paths, aligning fibers, isolating sources of error, making your system stable and repeatable.
Optics labs can be finicky — a single dust speck or mirror bump can derail your day. You’ll need patience, attention to detail, and the ability to track down what’s wrong and fix it. Think “detective with a laser.”
Sometimes you’ll spend more time aligning the setup than running the experiment — and that’s perfectly normal.
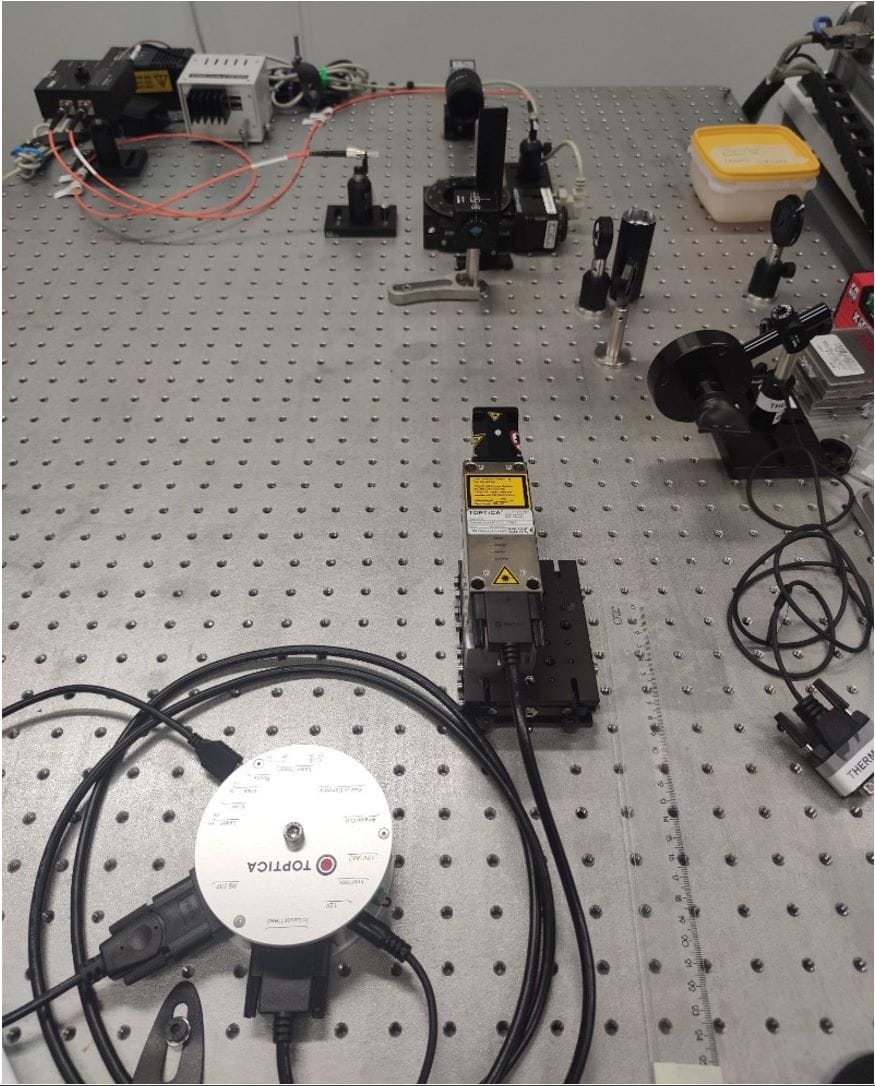
Figure 6. An optical table.
6. Programming & data analysis
Used when: processing signals from detectors, reconstructing images, automating measurements, simulating light transport.
Once light passes through tissue and hits the detectors, it becomes numbers — and you’ll need to make sense of them. Skills in Python, MATLAB, or similar languages help you filter noise, build reconstructions, and extract useful information like oxygen levels or tumor contrast.
The laser might shine for femtoseconds, but data analysis can take hours — unless you write good code.
7. Mathematics & modeling
Used when: simulating light propagation (e.g., solving diffusion equations), reconstructing images from raw data, interpreting complex signals.
Much of the physics behind light in tissue can be described by mathematical models. Whether you’re doing Monte Carlo simulations or solving inverse problems, math helps you predict how your system behaves and validate your results.
Reconstructing an image from scattered light is like solving a 3D puzzle with most of the pieces missing — math fills the gaps.
8. Communication & collaboration
Used when: discussing results, writing papers, presenting findings, or working with doctors and engineers from other fields.
Optics labs often sit at the intersection of physics, biology, and medicine. Whether you’re talking to a surgeon about your imaging system or explaining your results at a conference, clear communication is essential.
Being able to explain your laser experiment without saying “just trust me” is a superpower.
Why working in an optics lab is so rewarding
At the end of the day, working in an optics lab is about more than just aligning mirrors or crunching code. It’s about seeing the invisible — finding ways to uncover what light can tell us about the world, about materials, and even about ourselves.
Whether you’re bouncing photons through a drop of water, tracking how they scatter in tissue, or turning noisy measurements into life-saving medical insights, you are a part of a long tradition of exploring the universe with light.
It’s the kind of work where science meets creativity. One moment you’re tightening screws on a laser mount, the next you’re solving an equation that could lead to better cancer detection or brain imaging. It’s hands-on, high-tech, and deeply human.
So, the next time you shine a laser pointer through your finger and watch that eerie red glow, remember: that simple moment holds the same physics that powers real medical imaging systems in hospitals and labs around the world.
In the optics lab, that glow isn’t just cool — it’s a glimpse into the we can control light to get a view of a body parts inside out.
Created with the help of ChatGPT.
About the author: Konstantin Tamarov works as a postdoctoral researcher at the Department of Technical Physics in the University of Eastern Finland.


